Pages

Monday, October 28

Halloween Banner Tutorial


Here is a last minute Halloween banner
(in my world I'm right on time,in blogland
 internetville I'm always 5 months behind.)
because sometimes you just gotta make stuff,
even when you know you need to go to
bed and you just keep going anyway
because you don't know when you'll get another chance
to cut little colored shapes of canvas and sew them onto wonderful
little black fabric and drape them around the house
because these kids are only 5 and 2 once and
when they wake up it's like magic.
How did this happen, Mom?
Seriously. excitement around here is so simple these days.
Hearing the ding ding (railroad crossing) go off.
Jack (5):Roll down the windows! It's our lucky day!
Going through the car wash.
Finding yogurt covered pretzels with black and
orange sprinkles in the snack bowl.
Mom, I can't believe you got these for us.
Squirting whipped cream right into your mouth.
Um, I don't think you're allowed to do that.
Okay, on to the tutorial.
Here's what you need:
1/2 yard of canvas (any kind. mine was pretty thick.)
1/2 yard of orange and black fabric scraps
Black acrylic paint
Letter Stamps
Orange thread
*Warning: these are approximate measurements.
I have no patience for measuring things.
Try to make me. I won't.
1. First, cut 11 canvas triangles.
Cut 2 strips of canvas about 2 inches wide,
then cut the strips diagonally,
from top to bottom, to create the triangles.
2. Cut black and orange triangles to go
behind the canvas triangles.
I traced around each canvas triangle onto the colored fabric about a 1/4 inch.
Alternate black and orange.
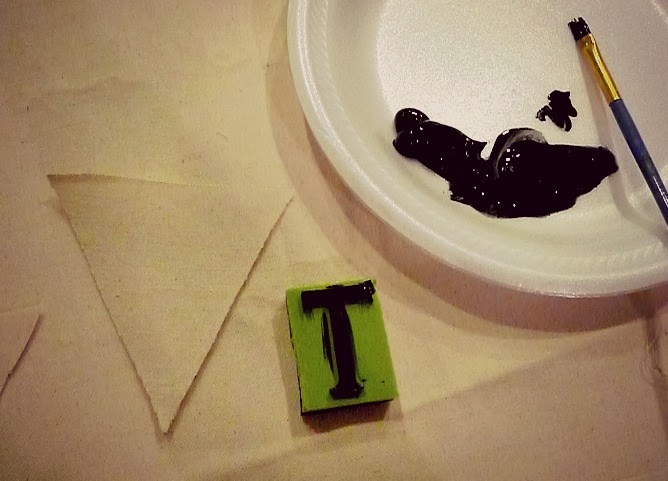
3. Stamp each letter on the banner with black acrylic paint.
I used basic letter stamps from Michael's.
If you don't have stamps, you can also paint the letters on,
or write them in Sharpie.

4. Sew long 1 inch wide strips of fabric together.
I actually ran out of thick black ribbon, so I decided to try
just sewing strips of fabric together, and it worked.
I don't do hems either. They bore me to tears,
so there are some frayed edges, but not many.
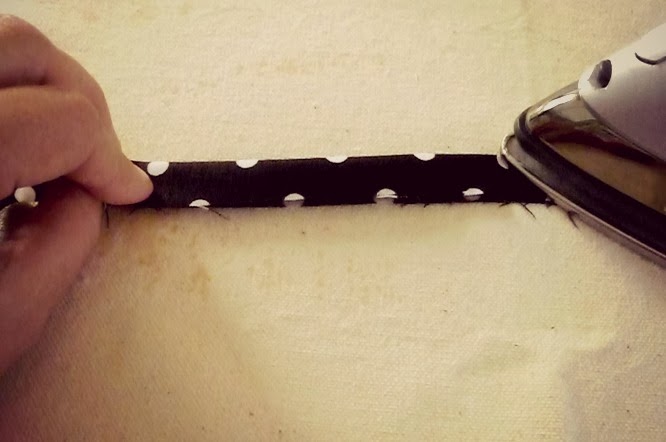
5. Iron the big, long, sewed-together strip in half.
6. Place the triangles on top of each other
and stuff them in the fold together.
Now sew like the wind. with orange thread. and a zigzag stitch.
Here is the secret to getting it centered...
(And here is why I make the big bucks)
Are you ready...start in the center, then work out.
Brilliant, right?
7. Smile because you just made something out of nothing
and you feel satisfied and your kids are going to like it, too.


Happy making, friends.
Photobucket

Sunday, October 27

Scripture Art Printable and a little bit of life


Happy Sunday friends.
Here's a little scripture art printable for
you and the people you love.
Click here to print out a 4 x 6.


His grace is always enough.
Even when it seems like it's not, it somehow is. I don't know how.
His power is made perfect in all of our brokenness and our mess.
I don't really get it, but I know I forget it a lot so I made this mostly as a
reminder to me and I wanted to share it with you.


I'm finally decorating for Halloween with some bunting.
and more bunting.
Makes me happy.
I can't help it.


And making art making:
this verse


and these autumn leaves


and the aftermath


and paper makes me happy, too.


and spraying and putting on hardware.
not my favorite part.


We passed out cookies to strangers on the train with our friends


Kristi, Lake, and Summer.


Making new friends...


I don't know if we gave away more or ate more.


My mom and I took the kids to Knott's for the day...


We had a little medical emergency in the family, but after daddy
came home and performed surgery, everything was okay.
We're still recuperating.
You can see the gory details here.


Happy October brave souls.
Photobucket

Monday, October 21

Free Scripture Art Printable & a Little Twinkle Light


Hi Friends. 
I'm off from teaching. For two weeks. Sigh. 
My school has a break at the end of October. 
Two weeks. It's the best. Don't hate. 

First of all, this: 
Do you know Sweet Jilly already? Such a little twinkle light. 
Jeanette is hosting a fundraising for epilepsy
She does such a great job of explaining their experience with
 epilepsy and how it affects, not just Jilly, but everyone in her sphere.
I'm embarrassed to say I don't know much about it, 
but to hear it through a mommy's eyes is gut wrenching
and makes it way more real than simply hearing that someone has epilepsy.
Every little bit helps. It's amazing what we can do together. 
Just a $5 or $10 donation. I'm skipping my Starbucks for the week.
Not because I'm great, just because it's the only $ I can find in our budget.


Second, I'm honored to be contributing a to Pick Your Portion today.
A different writer or artist contributes each
day in response to reading plan.
Enjoy!


Photobucket

Sunday, October 13

Fall Cleaning: 50% All Original Mixed Media Collage

What better gift to give than the gift of original art?
I'm cleaning out my studio, just in time for the holidays.
All original collages are 50% off in my shop.

At $48 for each original 11 x 14 on canvas or wood, 
and $42 for each original 8 x 10 piece,
original has never been more affordable.

Each piece is uniquely handmade with love and care 
by me in my studio (aka: our kitchen table).
It takes countless hours to create layer upon layer,
adding paper and paint and detail as I go.
It is a labor of love. 

Here are some of the originals that have just been listed:

Friday, October 11

Homemade Rollerskates Tutorial {For kids whose parents won't buy them roller skates.}

First beg your mom to go buy you rollerskates.
When your mom says no go get:
Homemade Rollerskates 1.0
duct tape
lego wheels


Homemade Rollerskates 2.0
{a variation on the theme}
duct tape
duplo wheels
(genius!)

 
And of course Joshy has to join in the action.
He will not be left behind.

Homemade Rollerskates 3.0
duplo
Camo rain boots
duplo wheels

What more could a kid ask for?
This just proves that you can make
anything with duct tape.


Photobucket